Posts tagged ‘SBS 2003’

SBS Migration

There are dozens of articles and white papers regarding migrating SBS version 20xx to version 20xx but many people seem to have difficulty locating these.  The following is a collection of some of the more popular options and methods.

Firstly there is no upgrade option, and if you have never done a migration I strongly recommend carefully reviewing documentation and try a migration in a test lab first as it is a lengthy procedure due to all the components included in an SBS environment.  You might want to considering hiring someone experienced with doing so, or perhaps buy a Migration “Kit” from swingmigration.com  SwingMigration.com specialize in migrations, and in particular SBS.  They provide detailed documentation for you specific migration scenario, some basic tools, 90 days support for the migration, and a method that allows you to revert back to your original configuration at any point.

If you want to go it on your own, or just read up on the topic, thee links may be of some help.

SBS 2003 to SBS 2003

Migrating Windows Small Business Server 2003 to New Hardware

SBS 2003 to SBS 2008

Migrating to Windows Small Business Server 2008 from Windows Small Business Server 2003

Philip Elder’s: SBS 2003 to SBS 2008 Migration Guide

Windows Small Business Server 2008 – Build information (Wiki)

SBS 2003 to SBS 2011

Migrate to Windows Small Business Server 2011 Standard from Windows Small Business Server 2003

Philip Elder’s: SBS 2003 to SBS 2011 Migration Guide

Glen Knight’s: Migrate Small Business Server 2003 to Small Business Server 2011 ( SBS 2011 migration guide )

SBS 2011 Standard Migrations – Keys to Success

Small Business Server 2011 Standard Build document (wiki)

SBS 2003 to SBS 2011 migration issues that you can call 1-800-Microsoft (or your local Microsoft support) and will get support and hotfixes included at no charge

SBS 2003 to SBS 2011 Essentials

Migrating Windows SBS 2003 to Windows SBS 2011 Essentials

Migrate All Mailboxes to the Cloud with a Cutover Exchange Migration

Robert Pearman’s: Migrating to SBS 2011 Essentials eBook

Windows Small Business Server 2011 Essentials Build document (Wiki)

SBS 2003 to Server 2008 R2 and Exchange

Glen Knight’s: Migrate Small Business Server 2003 to Exchange 2010 and Windows 2008 R2

Server 2003 standard with Exchange to SBS 2008

Glen Knight’s:Migrate Windows 2003 with Exchange to Small Business Server 2008

SBS 2008 to SBS 2011

Migrate to Windows Small Business Server 2011 Standard from Windows Small Business Server 2008

SBS 2011 to SBS 2011

Migrate Windows Small Business Server 2011 Standard to New Hardware

Migrating Windows SBS 2011 Essentials to New Hardware

Windows VPN Client Deployment

      subtitled: What happened to the SBS Connection Manager?

VPN name resolution is a common problem for many IT folk.  I have addressed in in previous blogs by manually configuring the VPN client to point to the corporate server for DNS, and adding the corporate domain suffix.  This is not practical as it has to be done on every computer on which the VPN client was configured.

Small Business Server 2003 had a very nice little wizard that would create a deployable VPN client called “Connection Manager” which contained server connection information and allowed for proper name resolution over the VPN.  Though the missing feature from subsequent SBS versions inspired this article, it can be used to create a deployable VPN client for any Windows Server.  The SBS wizard basically ran a mini version of a standard Windows tool called CMAK.

Firstly you need to install CMAK, the Connection Manager Administration Kit.  To do so, on a 2008 or newer server, open Server Manager under Administrative Tools, choose Features, and Add Features.  In the features wizard choose Connection Manager Administration Kit, and complete the wizard.

image

Though there are many configurable options and features that can be added with CMAK, for the purposes of this article only the basics will be configured to allow for VPN name resolution, automatic installation, and to try to replicate the old SBS 2003 Connection Manager experience.  One of the additional advantages of the Connection Manager Client is it limits the options with which the client can “tinker”, thus reducing support calls and increasing security.

In this example CMAK is being run on a 64bit machine. The deployable VPN client created can only be used on other 64bit machines. If you need to deploy on a 32bit machine you will need to install and run CMAK on a 32bit computer/server.  CMAK may not available from the built-in windows options on older operating systems.  If so, it can be downloaded as part of the Windows Server 2003 Administration Tools Pack (32bit) http://www.microsoft.com/download/en/details.aspx?displaylang=en&id=16770

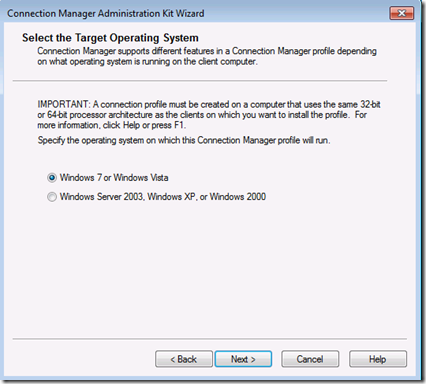
Start The Connection Manager Administration Wizard from Administrative Tools, accept the UAC warning, click next, and select the O/S on which the client will be deployed, remembering the above warning about 32/64 bit.

image

Select New Profile,

image

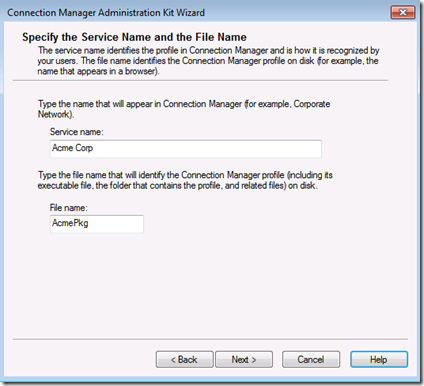
Enter a ‘Friendly’ name for the connection and a file name (<9 characters) for the deployment package.

image

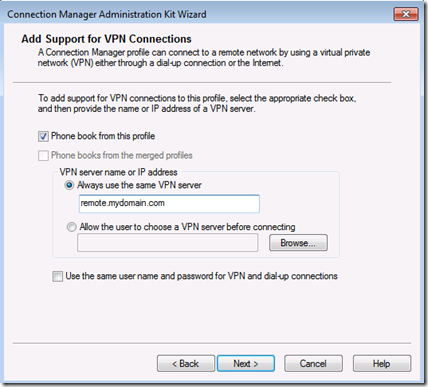
Rather than cluttering this post with unnecessary images, accept the defaults on the next two pages, “do not add a realm name to the user name” and leave the merge profiles boxes empty. In the next window, as per the image below, check Phone book from this profile, always use the same VPN server, and insert the public FQDN or IP of the VPN server.

image

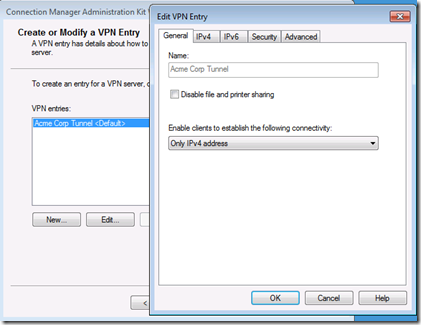
Next highlight your new connection and choose edit.  Under General select Only IPv4 addresses.  If you like, for added security you can disable file and printer sharing, which blocks access to shares on the connecting client’s computer while connected to the VPN.

image

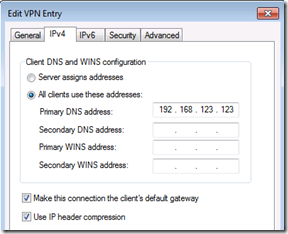
Under IPv4 add the internal IP for your corporate DNS server.  If you have multiple corporate DNS servers you can add a second, and if you have WINS servers you can add those as well.  Do not add public DNS servers here.  I recommend checking “Make this connection the client’s default gateway” (disabling split-tunneling) which blocks access to to the client’s local LAN while connected to the VPN.  By doing so Internet access is actually made via the VPN, rather than through the local router.  One reason you may need to un-check this is it also blocks access to a local networked printer, i.e. one that is not physically attached to the connecting computer.  Leave “Use IP Header compression” checked.  Note that in a user created VPN client using the tools built into a Windows PC, the “default gateway” option can be changed.  When created with CMAK it cannot be changed.  This is intentional for security reasons.  Split-tunneling, allowing the client simultaneous local and remote network access, is considered a security risk.

image

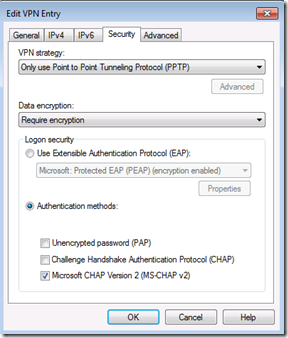
Under security you can leave the defaults or change to “Only use Point to Point Tunneling Protocol (PPTP)”.  If you are connecting to an old server it may also be necessary to also check CHAP authentication, but this is less secure than MS-CHAP v2, so only do so if absolutely necessary.  All 2008 and newer servers use MS-CHAP v2 by default.

image

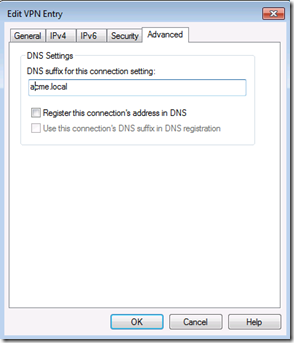
Under advanced add the internal corporate domain suffix.  Check “Register this connection’s DNS address in DNS” if for some reason LAN clients need to resolve the name of the remote computer.  I recommend not doing so if not needed as it adds unnecessary entries to DNS that may not be cleaned up if DNS scavenging is not properly configured.  Select OK, Next, and move on to the next window.

image

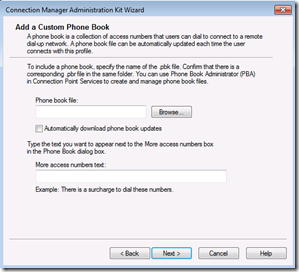
We are not using “phone books” so uncheck “Automatically download phone book updates”

image

From here accept all defaults in the next 4 windows; Configure Dial-up Networking, Specify Routing Tables, Configure Proxy Settings, and Add Custom Actions.

Note: it is assumed the server VPN configuration is basic, assigning IP’s in the same subnet for VPN clients as LAN clients, which is typical of SBS.  However, if the VPN clients are assigned addresses outside of the LAN subnet, and you want to access resources on the corporate LAN other than the VPN server, you will need to add a routing table file, on the “Specify Routing Tables” page, to have the route pushed out to VPN clients.

Though not necessary at all you may want to add a custom graphic or logo to the connection client. This is done on the “Display Custom Logon Bitmap” page followed by the ability to add a custom graphic in the phone book (list of connections), and on the 3rd related page you can choose to use  custom Icon for the deployed VPN connection.

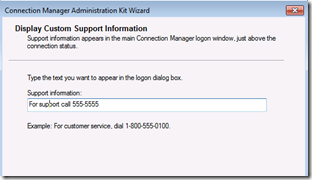
Leave the “Include Custom Help File” as default, and under “Display Custom Support Information”.  You may want to add contact information. This is displayed on the VPN connection client where they enter their user name and password, when trying to establish a connection.

image

Accept the defaults in the remaining windows; “Display a Custom License agreement” and “Install Additional Files…”.  In the final Window “Build the Connection Manager Profile and its Installation Program” leave Advanced uncheck, and assuming you do not wish to make any changes, click Next, and Finished.  The deployable package will be saved in a folder named profiles in the CMAK folder, the default location being: C:\Program Files\CMAK\Profiles\Windows 7 and Windows Vista\   You only need to copy the .exe file to the client computer, in this case AcmePkg.exe

image

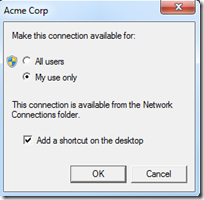
To configure the client, simply double click on the .exe file.  You will be prompted if you want the client to be available to all users or just the current user.

image

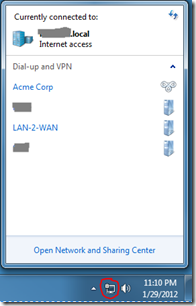
Click OK, and wizard will complete, add a connection icon to the desktop, add the connection to task bar network icon………

image

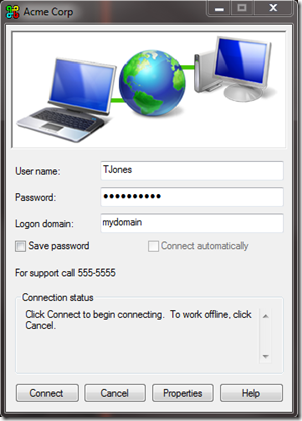
…….and launch the VPN client.

If you wish to connect enter the user name of a member of your VPN User group, their password, and internal domain name.  The domain name does not have to be present just to connect to the VPN, but in most cases if the PC is not domain joined, it needs to be there to access files using server names, rather than IP’s.

image

You should now have access to resources on the remote server, assuming the VPN at the server end is properly configured, and you have the appropriate Share and NTFS/Security permissions on the server to do so.

If needed, I have bloged in the past about configuring the VPN server.

Configuring a Windows SBS 2003 as a RRAS/VPN Server

SBS 2011 Essentials – Configuring VPN access

Configuring a Windows 2003 RRAS/VPN Server with 1 network adapter

Configure Cisco ASA for SBS 2008/2011 Network using CLI

I recently posted an article entitled “Configure Cisco ASA for SBS 2008/2011 Network using ASDM” which uses the GUI, a very lengthy process, but perhaps easier to understand for those not familiar with the Cisco Command Line Interface (CLI) like me.  However, I did promise to also post the handful of necessary commands to achieve the same thing using the command line. Please find the matching commands below using the same options and sample IP’s as in the previous post. You may wish to review the previous article should you require an explanation of why the various command are necessary. Note: this was done using ASA Version 8.2(5).

Basic router configuration; router name, domain, outside/WAN static IP and subnet mask, and management access:

hostname Cisco-ASA5505
domain-name MyDomain.local
Interface vlan2
ip address  123.123.123.123 255.255.255.248
no http 192.168.123.0 255.255.255.0 inside
http 192.168.123.0 255.255.255.0 inside
no telnet 192.168.123.0 255.255.255.0 inside
telnet 192.168.123.0 255.255.255.0 inside
enable password MyPassword

Disable DHCP on the Inside/LAN interface and set inside/LAN IP:

no dhcpd enable inside
Interface vlan1
no ip address
ip address  192.168.123.254 255.255.255.0
same-security-traffic permit inter-interface

Set default gateway on Outside/WAN interface:

route outside 0.0.0.0 0.0.0.0 123.123.123.121 1

Configure port forwarding for port 25 (SMTP/Exchange), port 443 (Https/RWW/RWA/OWA/Sharepoint), and port 987 (Sharepoint):

name 192.168.123.10 SBS-Server
asdm location 192.168.123.10 255.255.255.255 inside

static (inside,outside)  tcp interface 25 192.168.123.10 25 netmask 255.255.255.255 tcp 0 0 udp 0
static (inside,outside)  tcp interface 443 192.168.123.10 443 netmask 255.255.255.255 tcp 0 0 udp 0
static (inside,outside)  tcp interface 987 192.168.123.10 987 netmask 255.255.255.255 tcp 0 0 udp 0

access-list outside_access_in remark Allow SMTP traffic
access-list outside_access_in extended permit tcp any interface outside eq smtp
access-list outside_access_in remark Allow SSL-OWA-RWA Traffic
access-list outside_access_in extended permit tcp any interface outside eq https
access-list outside_access_in remark Allow SharePoint traffic
access-list outside_access_in extended permit tcp any interface outside eq 987
access-group outside_access_in in interface outside

Allow pings from LAN to Internet:

policy-map global_policy
class inspection_default
inspect icmp

Allow Tracert (requires ping policy changes above):

access-list outside_access_in line 3 remark Allow Tracert
access-list outside_access_in line 4 extended permit icmp any any

Save:

write mem

Configure Cisco ASA for SBS 2008/2011 Network using ASDM

Following is an outline as to how to configure a Cisco ASA 5505 for an SBS 2008/2011 network, including basic router configurations, IP addressing, and port forwarding, using the GUI/ASDM. The ASDM version used at the time of writing is 6.4(5), and ASA Version 8.2(5).  For the record this can be accomplished much more easily from the CLI/Command Line Interface, but we SBS folk tend to like to do things from a GUI.  I will however post a follow-up article outlining how to do so from the CLI, using only a handful of commands. [Updte: for CLI instructions see: https://blog.lan-tech.ca/2012/01/25/configure-cisco-asa-for-sbs-20082011-network-using-cli/ ]

It is assumed the ASA is still set to factory defaults. If so, skip to “Basic Router configuration”.

Reset to factory defaults:

Since this article is dedicated to using the ASDM console, to reset from within, simply log on, select “File” from the menu, and then “Reset Device to the Factory Default Configuration”.  If you do not have access to the ASDM console, i.e. you do not know the IP, you can use the blue console cable and access through Telnet. Once connected to the CLI (Command Line Interface) enter the following commands:

  • enable
  • config t
  • config factory-default  (press the space bar a few times when “more” is displayed to get back to the prompt)
  • reload save-config noconfirm  (to write to flash memory)
  • the unit will reboot with factory defaults

Basic Router configuration:

We will run the Start up Wizard to do the basic configuration. During the process do not make changes to the internal interface IP or Internal DHCP settings.

Launch the ASDM using https://192.168.1.1 , choose to ignore the certificate error, and select “run Startup Wizard”. When prompted for a username and password leave both blank. You can also start the wizard from within the ASDM from the menu under Wizards, Startup Wizard.

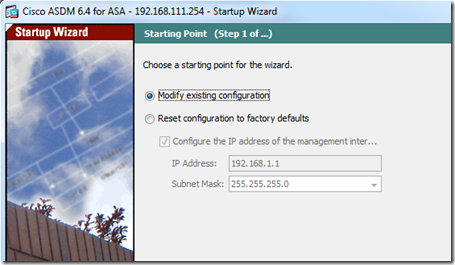
[ Edit: In case it is confusing; after publishing it was pointed out you can see the 192.168.111.254 current ASA address in the title bar. Please ignore, it is unrelated to the configuration. ]

Starting Point: In the first window accept the default “modify existing configuration” and click next.
image

Basic Configuration:  If you like you can change the ASA Host Name and domain, but I is not necessary. I strongly recommend changing the password, and make it secure. When you log back in later the user name will still be blank.

image

Interface Section: Leave all a defaults.

image

Switch Port Allocation:  Again the defaults are fine for this configuration.

image

Interface IP Address Configuration: Presumably you have been assigned a static public IP by your ISP where you are running a mail server. If so select “Use the following IP address”, enter the appropriate IP and subnet mask under “Outside Address”. (Note: you will need to add a static route for the default gateway later)

If  using DHCP with your ISP, select “Use DHCP” and check “Obtain default route using DHCP” (which will automatically add the default gateway).  When using DHCP you will probably also want to set up a DDNS service.  To do so see the following article: Using DDNS Services with SBS 2008/2011

The wizard will not allow you to continue without entering a DMZ address.  You will not be using the DMZ in this configuration so simply pick a private IP outside of any subnet you plan to use, and select a subnet mask of 255.255.255.0, if presented with a DMZ related error you can ignore.

image

DHCP Server:  We will deal with DHCP later along with the inside interface IP. Leave the current defaults “Enable DHCP” and the IP range for now.

image

Address Translation (NAT/PAT):  You will want to use PAT, so accept the defaults.

image

Administrative Access:  This determines from which IP’s or subnets you can access the ASA 5505 to manage it, and using which protocols. The current default is using the ASDM from the 192.168.1.0 subnet. If you plan to change the IP of the router to a different subnet you need to add it now, before making changes to the inside interface’s IP.  Assuming you later plan to use 192.168.123.0/24 (/24 = subnet mask 255.255.255.0) for your local network, I recommend adding that subnet to the inside interfaces, using two rules, one for HTTPS/ADSM and the other for Telnet, by clicking the “edit” button”.  Leave the “Enable HTTP server for HTTPS/ASDM access to this ASA” checked near the bottom.

image

Startup Wizard Summary: This page displays a summary of your choices. Review and click finish.

image

Disable DHCP:  Assuming you are running SBS 2008/2011 Standard and not SBS 20011 Essentials, you will need to turn off DHCP on the inside interface of the Cisco as the SBS server should most definitely be the DHCP server. If not convinced see: Do I absolutely have to run DHCP on SBS 2008?  If running SBS Essentials the default is to have the router as the DHCP server, though it does not have to be. To disable DHCP, log back into the ASDM if you are no longer connected, and navigate to; Configuration | Device Management | DHCP | DHCP Server | highlight the inside interface and click Edit” | uncheck “Enable DHCP server”. Then click OK and Apply at the bottom.

image

Change Inside interface (LAN) IP:  As mentioned earlier, for the purposes of this article we will use 192.168.123.x (properly represented as 192.168.123.0/24) and choose 192.168.123.254 as the router inside interface IP but for your configuration match the current subnet of your SBS server.

This will be the gateway IP for PC’s and servers on the SBS network. Navigate to: Configuration | Device Setup | Interfaces | Highlight the inside interface and select Edit and change the IP to that of your choosing. Click OK, then check the box “ Enable traffic between two or more hosts connected to the same interface” at the bottom, and Apply.

Note: Should you choose to enable a VPN, using the Cisco or the SBS built-in VPN, the site from which a client connects, must use a different Network ID (Subnet) than that of the SBS LAN. As a result, nobody connecting from a remote site that uses 192.168.1.x locally can connect to resources on this network. Therefore it is always a best practice to avoid common subnets like; 192.168.0.x, 192.168.1.x, 192.168.2.x, 192.168.100.x 10.0.0.x, and 10.10.10.x. However if your SBS is already configured you would need to change the network addressing for the entire network. In the event you were to choose to do so make sure you use the wizard for changing the server IP located under SBS console | networking | Connectivity | Connect to the Internet.  You also have to change any DHCP scopes, reservations, exclusions and device with statically assigned IP’s such as printers.

image

Add a static route for the router’s default gateway:  As mentioned before if you have with a static public IP assigned to the outside interface, you also have to create a static route to assign a default gateway to allow the router Internet access.  To do so select Device Setup | expand routing | Static Routes | and on the right click Add.  Select the outside interface, choose “any” for the Network from the drop down list and insert the gateway address assigned by the ISP, with a metric of 1.  The remaining items should retain the default settings. Click OK and Apply.

image

If you have not already done so, I would recommend saving all changes at this point by selecting from the menu File and then “Save running configuration to flash”, or at ant point simply press Ctrl+S to save.

Configure port forwarding:

SBS requires several ports be forwarded for various services.  Below is an outline as to how to configure port forwarding for SMTP (port 25). You will need to do this for each of the services in the following list that you plan to use:

  • SMTP port 25 Exchange
  • HTTPS / SSL port 443  Outlook web Access, Remote Web Workplace (Remote Web Access), and SharePoint
  • SharePoint custom port 987  (SBS 2003 not required)
  • RWW & Sharepoint 4125  (SBS 2003 only, not required for SBS 2008/2011)
  • PPTP port 1723 SBS VPN. The Cisco VPN is far more secure and moves authentication to the perimeter of the network. Far better to use it than the SBS VPN since it is included with the ASA 55050
  • RDP port 3389 (Definitely not recommended. Much safer to use RWW/RWA)

Add a NAT Rule:  Login into the ASDM, remembering to use the new IP address of the router. Navigate to Firewall | NAT Rules. on the right under addresses there is an option to +Add, select this and then Network Object. Enter the name of the Object, in this case the SBS, enter the IP (in our example 192.168.123.10) and  a subnet mask of 255.255.255.255.  (Adding a network object is not completely necessary but makes reviewing configurations at a later date easier to understand as items are referenced by name rather than IP)

image

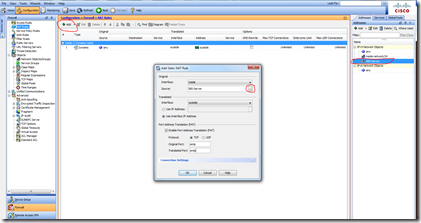
Next in the same Window, under “Configuration > Firewall  NAT Rules” in the tile bar, click +Add and select Add Static NAT Rule. In the resulting window set the “Original” Interface to inside and next to source click the drop down list button. Select your new object (SBS-Server in this example).  Set “Translated” Interface to outside, and check the box to “use interface IP address”.  Select Enable Port Address Translation (PAT), TCP, and enter either the port number, or in the case of most services you can enter the service name, if it is known to the Cisco router. A drop down list of known service will appear when you start to type the service name if one exists. If using non-standard services, enter the port number using the format tcp/987. The Original and Translated ports in this case should be the same.
image

Click OK and this will add the rule to the list of static rules.

image

Add an Access Rule:  Next, again in the firewall section, Navigate to Access Rules | Add | Add Access Rule.  Change the Interface to Outside, the Source will be “any”, Destination the outside interface, Service can again be selected from the drop down list, and add a description if you like.  Leave the “More Options” section set to defaults. Click OK and Apply.

image

Repeat the above steps for all services you will be using, probably HTTPS/443 and SharePoint/987, and don’t for get to save ( Ctrl+S) when complete.

This should complete the SBS requirements.

Additional Features you may wish to enable:

  • To enable pinging of internet IP’s from the LAN for testing, navigate to: Configuration | Firewall | Service Policy Rules | highlight the policy under Global Policy and click edit | Rule Actions | check the box for ICMP | click OK and Apply.
  • To allow Tracert to internet IP’s, add the ICMP rule above, then while still under the Firewall configuration switch to the Access Rules item click Add | Add Access Rule | then set the interface outside, action is Permit, and Source/Destination is any. Under Service, enter icmp, it should auto-fill or you can use the drop down list line and click OK.  Click OK again in the Add Access Rule dialog and Apply the results to finish the process.