Archive for the ‘SBS 2003’ Category

Convert SBS 2003 to a virtual server

I recently needed to virtualize an SBS 2003, that is to say convert it from a physical machine to a virtual machine on a Hyper-V host.  I have done SBS conversions to VMware hosts in the past with with little or no problem, but converting to Hyper-V, my preference , was a little more involved.  I first Googled the task and found many suggestions which based on the various articles and instinct, using Microsoft’s disk2vhd was the simplest solution.  I was wrong.  The first run on a test machine using a single disk worked well but did require several ‘tweaks’, and then when I added the data drives, which may have been unrelated, I ran into many problems, especially when I tried installing the Integration Services components.  Though disk2vhd has worked well for me with other operating systems in the past, for some reason the HAL in this case caused problems.

I am not suggesting the following is the best method, or even a good method, but perhaps it will be of some help to those attempting the same task.   I have posted the steps that worked flawlessly for me on a test server, trail run, and final move.  All of the following was done remotely.

Note: The process will require re-activation of the SBS license.  If SBS is an OEM version; it is a licensing violation to install on different hardware or virtualize, the activation will probably fail, and if it does Microsoft will not assist.

  • If working remotely you will need to maintain access at least to the Hyper-V host throughout entire process.  You can use RDP, VPN, LogMeIn, or any of a dozen other alternatives, but make sure it is in place and working, your existing RWW is about to stop functioning until complete.
  • Clean up the initial machine:  Remove the second/WAN NIC if present (not the LAN NIC) and run the CEICW (Configure e-mail and Internet Connection Wizard). Note that making network changes remotely can be risky, you can loose access.
  • Run the SBS 2003 Best Practices Analyzer and resolve any problems. 
  • Presumably you do not want e-mail delivered to the server, or remote users accessing the server,  during the move, so log onto the router and disable port forwarding on the necessary SBS ports 25, 443, 444, 1723 and 4125, for now.
  • Download and run the free VMware converter tool.   When running the tool make sure you right click on the program icon and choose “run as administrator”, if not you will receive an error; “A general system error occurred: Crypto Exception: error:02001005:system library:fopen:Input/ output error:unable to load C:\ProgramData\VMware\VMware vCenter Converter Standalone\ssl\rui.crt”. 

image

  • Clicking Next will deploy the conversion agent

image 

  • In the “Destination System” window choose destination type as “VMware Workstation or other VMware virtual machine” and “VMware Server 2.x”.  The destination file location path must be to a network share, even if on the local machine.  I also found if running VMware Converter on the Hyper-V server, due to limited name resolution services running and not being a domain member, using the IP in conjunction with the user name worked best, such as 192.168.123.123\UserName, even if it is the local machine.  This was a simple workaround for the common credential error received by many; “The operation could not be completed for username due to incorrect user credentials”

image

  • Review the specifications for the resulting VM as to how much RAM is to be assigned (SBS 2003 is limited to 4GB), number of processors, and if you want to change/increase disk sizes.

image

image

  • In my experience the tool took less than 3 hours to convert about 100GB of files on 2 drives using a 10/100 mbps network, a relatively small site.
  • Next download and run the Starwind’s free V2V conversion tool . This will allow you to convert the vdmk file, or files, created by the VMware converter to vhd files which will be compatible with Hyper-V.  If you have more than one vdmk, you will need to convert one at a time. You only need the vdmk’s, the other config file/s created by the VMware converter are not necessary.

image 

  • When running the tool, point to the vdmk file and choose to convert to “MS Virtual PC” format.  You can also choose whether the resulting vhd (Hyper-V disk) is to be a “pre-allocated” or “growable” image.  These are Starwind’s terms for a “fixed size” or “dynamically expanding” disk.  The former, “fixed” is recommended on domain controllers, but not a requirement on recent Hyper-V servers.

image

  • I found the V2V conversion took about 60-70% as long as the previous P2V step. Once completed if you need the drive space you can delete the .vdmk and other files created by the VMware Converter tool.
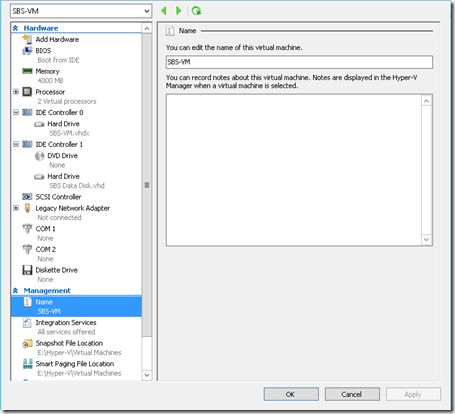
  • Using the Hyper-V management console you can now create a new VM using the wizard.  When doing so  presumably you want the maximum RAM, so set to 4000 MB, leave the network adapter as “not connected”, under “Connect Virtual Hard Disk” choose “Use an existing virtual hard disk” and select your system disk (disk containing the C: partition) created by the P2V/V2V steps above, under “Installation Options” select “Install an operating system later”, and click finish.
  • Next, open the settings console for the newly created VM.  It will have added a network adapter, remove it and add a legacy network adapter but again if the existing SBS is still powered up on the same network segment choose “not connected”, if you have multiple physical or virtual processors (cores) adjust the number of processors, if you have multiple disks add the others, and review the remaining settings.

image

  • You are ready to start up the new VM.  Boot the Virtual SBS and log in.  Ignore any offers to discover and add new hardware.  You will be a notice you have 3 days to activate.  I recommend waiting until complete before doing so.  As mentioned do not install any hardware, but you may be prompted at different stages to reboot which you should do.  Note that you will have no mouse for this or the next 4 steps.
  • Manually configure the server’s NIC with the LAN IP, Gateway, and DNS pointing to its LAN NIC IP.  You can keep the same IP as the previous server if using the steps I have outlined.
  • Run the “Change Server IP Wizard” located under Server Management / Internet and E-mail, and keep the same IP as you just set.  The wizard will likely tell you it failed and you should run again due to inaccessibility to the LAN.  You can ignore.
  • Run the CEICW (Configure E-mail and Internet Connection Wizard) angin located under Server Management / Internet and E-mail, and make no changes, just accept the existing configurations.
  • Install the Hyper-V Integration Services by clicking “Insert Integration services Start Up Disk” under “Action” on the menu bar.  Allow this to complete and reboot as requested.  This can take a little while to run sometimes.
  • After reboot you may want to do some tweaking such as changing display size settings. 
  • You may also receive a message after rebooting; “At least one service or driver failed during system startup”.  Though this could be anyone of a dozen services, reviewing the event logs may show a parallel port service error.  To resolve this, on the VM from a command line run;  sc config parport start= disabled
  •   If not automatically removed, uninstall the VMware vCenter Converter Standalone Agent, using add/remove programs in the contol panel.
  • Flush the DNS, NetBIOS, and arp cache to be safe using  “ipconfig  /flushdns”, “nbtstat  –R”, and “arp  –d  * “
  • At this point you should be able to shut down the old server.  You may want to verify WakeOnLan is enabled and record the MAC address if you think you might have to remotely restart.  If so, you can download Solarwind’s Wake-On-LAN tool.
  • You can now enable the Virtual NIC on the SBS by choosing the physical NIC (Virtual Switch) to which you want to associate the Virtual NIC, in the settings configuration of the VM.
  • Perform any internal testing such as access to other LAN resources, Internet access, printer availability, services by clients are working such as redirected My Documents, and anything else with which you might be concerned.
  • Assuming all is well you can now forward the ports on the router to the new Virtual SBS to allow incoming e-mail and remote access by users.
  • Test e-mail reception, and finally activate the server through windows Activation process.

Locate default Computer or User OU

In troubleshooting an issue with the SBS user creation wizard, I wanted to know what was set as the default Organizational Unit in which users would be placed.   Though the following works with any server version which is domain functional level Server 2003 or newer, SBS defaults to placing users in the MyBusiness\Users\SBSUsers OU and I wanted to verify this was set appropriately.  There are 100 articles explaining how to change the default users OU using the command “Redirusr”, or “Redircmp” for computers, but it was difficult to find a link explaining how to locate the current defaults.  There are a few links explaining where the information is stored, which is in the “wellKnownObjects” attribute of the properties of the domain, in Active Directory Users and Computers.

image

However when you click on “View”, to inspect the settings for that attribute, you get a popup warning; “There is no editor to handle this attribute”, and the same happens when using ADSI Edit.

image

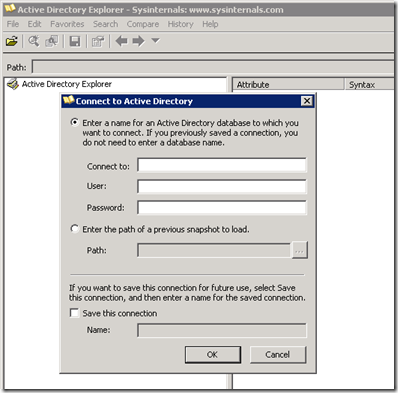
Thanks to a tip by Alex Verboon, using Microsoft’s (Sysinternal’s) Active  Directory Explorer will allow you to see the settings of this attribute.  Download AD Explorer, run the app, on a single domain server you can live all fields blank and click OK.

image

Click on your domain, then in the right hand window right click on wellKnownObjects”, and choose properties.

image

In the resulting window you can review the current settings for the default OU’s for Computers and Users

image

image

Sharepoint update KB2596911 on SBS

I just installed “Security Update for Windows Services 3.0 x 64 KB2596911” on a clients SBS 2008 server, as 1 of 6 updates, only to have it fail.  Upon reboot neither Sharepoint website or the WSUS console were functioning.  In addition the Application Event Log was full of Event ID 5084, Source MSSQL$MICROSOFT##SSEE informational events.  A quick Google showed many folk have encountered similar issues, for example:

http://social.technet.microsoft.com/Forums/en-US/sharepointadmin/thread/e8391454-a5b2-418f-8dab-324c430ce219

In my case after the reboot I was able to resolve by downloading the single update from the link below, right clicking and choosing run as administrator, and wait, and wait, and wait!  Be patient, the update though small took about 45 minutes to complete but it was successful, and all services restarted.  Though it did not prompt for a reboot I felt it was best to do so and everything still functioned properly.

http://www.microsoft.com/en-us/download/details.aspx?id=30274

For the record, there is no mention of it in the KB article, but during the install it advises that you need volume licensing to use the update.  I choose to accept the notification and continue, working on the assumption the licensing referred to the base product.  In my case this was being installed on Small Business Server where Sharepoint is an integrated component.

This may not be a solution in all cases, but it was a simple, though tedious, repair for this server.

WSUS Update KB2720211 Issues

There have been numerous problems reported after installing Microsoft update KB2720211

  • WSUS server stops synchronizing with Microsoft Update
  • Website Verifications are not accurate
  • WSUS server stops working and also fails to reinstall
  • Errors in errorlog for Windows internal database
  • Some have reported backups fail to run on SBS

Should any of these be plaguing your systems Microsoft just released a TechNet Blog article addressing these issues which may be of some help:

http://blogs.technet.com/b/sus/archive/2012/06/20/wsus-kb272011-common-issues-encountered-and-how-to-fix-them.aspx

If interested in reading about end user reports, currently the key links to follow are:

http://social.technet.microsoft.com/Forums/en-US/winserverwsus/thread/e918a191-ef6d-4c4b-b83a-7a4ae20a5217

http://byronwright.blogspot.nl/2012/06/kb-2720211-kills-wsus.html

http://tinyurl.com/c2clhht

http://www.experts-exchange.com/OS/Microsoft_Operating_Systems/Server/SBS_Small_Business_Server/Q_27758486.html#a38107387

Google/Bing KB2720211 to locate more.

SBS connect / connectcomputer wizard fails

Generally when a computer cannot join the domain using http://connect (SBS 2008 & 2011) or http://SBSname/connectcomputer (SBS 2003) it is due to inability to correctly resolve the name of the domain controller in a timely fashion. Below is a list of common reasons for the connect wizards to fail.

In an SBS domain, the server should be the DHCP server, and if so, items 3 and 4 below should be automatically set through DHCP.  However if addressing is statically assigned or you are using a router you may need to make changes. Items 3 and 4 are also basic networking requirements of a Windows Domain, not just important for joining the domain.

1. If there is more than 1 network adapter installed, wired or wireless, disable all but 1 until domain joined.  If at all possible, make it a wired connection, not wireless. 

2. Many new PC’s also show a Bluetooth connection under “Network Connections”, this should be disabled as well while running the wizard.  If you are using a Bluetooth mouse and/or keyboard these will have to be temporarily replaced.

3. Make sure, using IPconfig /all, that the client’s DNS points ONLY to your internal DNS servers, in this case the SBS.  Do not allow a router or ISP to be added even as an alternate.

4. IPconfig /all should also show next to “Primary DNS Suffix”” your internal domain suffix such as MyDomain.local.  If not you need to add the domain suffix to the client machine. To do so insert it in the “DNS suffix for this connection” box under the DNS tab of the NIC’s advanced TCP/IP IPv4 properties

5. If there are any 3rd party firewalls or security suites installed, disable them until joined to the domain.  The Windows firewall should not need to be disabled.

6. If still failing add the connect web site to the “trusted” sites list in Internet Explorer under Tools | Internet Options | Security |trusted Sites

7. If all else fails you can skip the wizard and use a 3rd party utility called ProfWiz.  

It is important to note that using the connect and connectcomputer wizards is very important.  With SBS 2003 it is especially critical to do so as it performs a long list of tasks other than just joining the domain.  It copies the local user’s profile, configures the user and computer environments, changes permissions, installs SBS related features, makes changes to networking, and much more.  Susan Bradley’s blog outlines this in detail: “So exactly “what” does connect computer do anyway?”  However SBS 2008 and SBS 2011 control most of this through Group Policy.  The key bonus feature with the SBS 2008/2011 wizard is its ability to import current users’ local profiles. Though I still strongly recommend using the wizard, it will only import a local workgroup profile.  If the wizard fails or you are wanting to import a previous domain profile, you may want to consider using Profwiz.  Profwiz by forensit.com a simple little tool that will join the PC to the domain and reset the permissions of an existing profile allowing it to be used as the new domain profile (i.e. import users settings like desktop items, favorites, Documents, and application configurations). For instructions on downloading and running see:  https://blog.lan-tech.ca/2011/05/19/sbs-and-profwiz/

SBS Missing Attributes tab in AD

It seems the Attributes tab is missing on the user profile in Active directory after a migration from SBS 2003 to SBS 2008 and SBS 2011.  Normally this is hidden, but easily reviled by selecting on the AD menu bar; View, and then Advanced Features, however this is not so after a migration.  The issue was addressed in a post by Stuart Hudman  http://social.technet.microsoft.com/forums/en-US/winserverManagement/thread/6e6ef6bd-b5c9-4f16-b346-097832e3b93c/  but I was recently asked to help locate the exact location for the required changes, so I have posted detailed instructions below.

As always, you should have a good backup, including system state, before editing AD.
Note: the values to add, such as “11,{c7436f12-a27f-4cab-aaca-2bd27ed1b773}” need to be exact , without quotes. All three entries are similar but copy carefully as they are not the same. There will probably be multiple entries already present under the attribute, you are just adding one more….assuming it is not already present, which you should check first.

-open ADSIedit.msc
-at the top of the ‘tree’ right click on ADSIedit and choose “connect to”
-under connection point select “select a well known Naming context” and in that window choose “Configuration”
-under computer leave as “Default (Domain or server that you logged into)” Assuming you are logged onto the SBS
-click OK
-expand (click on the +) CN=configuration, DC=<your domain>, DC=local
-expand CD=DisplaySpecifiers
-click on CN=your language. The language # can be found on http://support.microsoft.com/kb/324097 (for example US English is 409, so CN=409  (this is the language you chose when setting up the server)
-in the right hand window locate CN=User-Display right click on it and choose properties.
-Locate AdminPropertyPages, highlight it and click “edit” and add the line 11,{c7436f12-a27f-4cab-aaca-2bd27ed1b773}
-in the right hand window locate CN=Computer-Display right click on it and choose properties.
-Locate AdminPropertyPages, highlight it and click “edit” and add the line 12,{c7436f12-a27f-4cab-aaca-2bd27ed1b773}
-in the right hand window locate CN= Default-Display right click on it and choose properties.
-Locate AdminPropertyPages, highlight it and click “edit” and add the line 4,{c7436f12-a27f-4cab-aaca-2bd27ed1b773}

SBS Migration

There are dozens of articles and white papers regarding migrating SBS version 20xx to version 20xx but many people seem to have difficulty locating these.  The following is a collection of some of the more popular options and methods.

Firstly there is no upgrade option, and if you have never done a migration I strongly recommend carefully reviewing documentation and try a migration in a test lab first as it is a lengthy procedure due to all the components included in an SBS environment.  You might want to considering hiring someone experienced with doing so, or perhaps buy a Migration “Kit” from swingmigration.com  SwingMigration.com specialize in migrations, and in particular SBS.  They provide detailed documentation for you specific migration scenario, some basic tools, 90 days support for the migration, and a method that allows you to revert back to your original configuration at any point.

If you want to go it on your own, or just read up on the topic, thee links may be of some help.

SBS 2003 to SBS 2003

Migrating Windows Small Business Server 2003 to New Hardware

SBS 2003 to SBS 2008

Migrating to Windows Small Business Server 2008 from Windows Small Business Server 2003

Philip Elder’s: SBS 2003 to SBS 2008 Migration Guide

Windows Small Business Server 2008 – Build information (Wiki)

SBS 2003 to SBS 2011

Migrate to Windows Small Business Server 2011 Standard from Windows Small Business Server 2003

Philip Elder’s: SBS 2003 to SBS 2011 Migration Guide

Glen Knight’s: Migrate Small Business Server 2003 to Small Business Server 2011 ( SBS 2011 migration guide )

SBS 2011 Standard Migrations – Keys to Success

Small Business Server 2011 Standard Build document (wiki)

SBS 2003 to SBS 2011 migration issues that you can call 1-800-Microsoft (or your local Microsoft support) and will get support and hotfixes included at no charge

SBS 2003 to SBS 2011 Essentials

Migrating Windows SBS 2003 to Windows SBS 2011 Essentials

Migrate All Mailboxes to the Cloud with a Cutover Exchange Migration

Robert Pearman’s: Migrating to SBS 2011 Essentials eBook

Windows Small Business Server 2011 Essentials Build document (Wiki)

SBS 2003 to Server 2008 R2 and Exchange

Glen Knight’s: Migrate Small Business Server 2003 to Exchange 2010 and Windows 2008 R2

Server 2003 standard with Exchange to SBS 2008

Glen Knight’s:Migrate Windows 2003 with Exchange to Small Business Server 2008

SBS 2008 to SBS 2011

Migrate to Windows Small Business Server 2011 Standard from Windows Small Business Server 2008

SBS 2011 to SBS 2011

Migrate Windows Small Business Server 2011 Standard to New Hardware

Migrating Windows SBS 2011 Essentials to New Hardware

How can I add CALs to my SBS 2003, or SBS 2008

SBS 2003 CAL’s and SBS 2008  are no longer available for purchase, however there are still many of these servers in use and some in growing companies in need of additional CAL’s.  The solution is to buy SBS 2011 CAL’s and exercise downgrade rights.  Microsoft does have very good documentation available for doing so, but based on questions in the forum it seems to be very difficult to find, partially because the links have changed several times.  This article is by no means authoritative, you should refer to the current Microsoft documentation, but it is pulled, word for word, from the most recent documents I was able to find;   SBS 2011_Licensing_FAQ

The following outlines the options for purchasing, the downgrade rights available, and how to install the SBS 2003 CAL’s.  SBS 2008 of course does not require the CAL’s to be installed, you just have to maintain documentation for your CAL licensing for any potential audits.

Q. How do I obtain CALs for earlier versions of Windows Small Business Server when they are no longer offered on price lists?
A. It depends on what editions you need CAL for:

  • If you need additional SBS 2008 or SBS 2003 Standard CALs; you will need to acquire Windows Small Business Server 2011 CAL Suites and exercise your downgrade rights.
  • If you need additional SBS 2008 Premium CALs, they will remain available on the Open price lists for a period of time. This is due to the fact that the SBS 2011 Premium Add-on does not include the same components that are in 2008 Premium and therefore the SBS 2011 Premium Add-on CAL Suites do not offer downgrade rights.

Customers who acquire SBS 2011 CALs or SBS 2011 Premium Add-on CALs are eligible for the following CAL downgrades:

image

Q. How will SBS 2003 CAL activation work in that scenario since SBS 2011 [Edit: and 2008] does not require CAL activation but SBS 2003 does?
A. If you have acquired SBS 2011 CALs through the Volume Licensing (VL) channel, you can obtain SBS 2003 CAL product keys through the Volume Licensing Service Center (VLSC); these keys can then be used to downgrade to SBS 2003 (R2) CAL’s. For customers who have acquired SBS 2008 and 2011 CALs from channels other than VL, such as FPP and OEM, please use the following product keys to activate SBS 2003 Standard CALs.

A product key can only be used once to activate the designated number of CALs for that given key. Therefore a combination of keys may need to be used to activate all of your 2003 CALs. We have provided 3 keys that will activate 5 CALs each and 3 keys that will activate 20 CALs each. This is so customers can activate anywhere from 5 to the maximum number of 75 CALs supported with SBS 2003. It is recommended that you use the 20 CAL Keys first and then use the 5 CAL keys to avoid a situation where adding the 20 CAL key(s) last may put you over the 75 CAL limit when you have existing CALs.

image

Windows VPN Client Deployment

      subtitled: What happened to the SBS Connection Manager?

VPN name resolution is a common problem for many IT folk.  I have addressed in in previous blogs by manually configuring the VPN client to point to the corporate server for DNS, and adding the corporate domain suffix.  This is not practical as it has to be done on every computer on which the VPN client was configured.

Small Business Server 2003 had a very nice little wizard that would create a deployable VPN client called “Connection Manager” which contained server connection information and allowed for proper name resolution over the VPN.  Though the missing feature from subsequent SBS versions inspired this article, it can be used to create a deployable VPN client for any Windows Server.  The SBS wizard basically ran a mini version of a standard Windows tool called CMAK.

Firstly you need to install CMAK, the Connection Manager Administration Kit.  To do so, on a 2008 or newer server, open Server Manager under Administrative Tools, choose Features, and Add Features.  In the features wizard choose Connection Manager Administration Kit, and complete the wizard.

image

Though there are many configurable options and features that can be added with CMAK, for the purposes of this article only the basics will be configured to allow for VPN name resolution, automatic installation, and to try to replicate the old SBS 2003 Connection Manager experience.  One of the additional advantages of the Connection Manager Client is it limits the options with which the client can “tinker”, thus reducing support calls and increasing security.

In this example CMAK is being run on a 64bit machine. The deployable VPN client created can only be used on other 64bit machines. If you need to deploy on a 32bit machine you will need to install and run CMAK on a 32bit computer/server.  CMAK may not available from the built-in windows options on older operating systems.  If so, it can be downloaded as part of the Windows Server 2003 Administration Tools Pack (32bit) http://www.microsoft.com/download/en/details.aspx?displaylang=en&id=16770

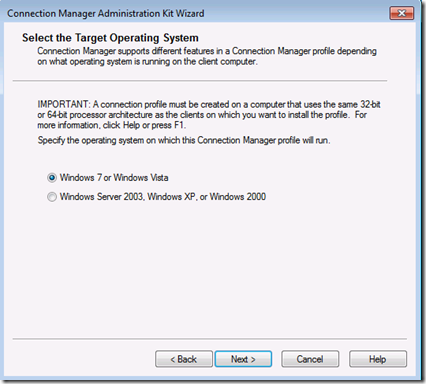
Start The Connection Manager Administration Wizard from Administrative Tools, accept the UAC warning, click next, and select the O/S on which the client will be deployed, remembering the above warning about 32/64 bit.

image

Select New Profile,

image

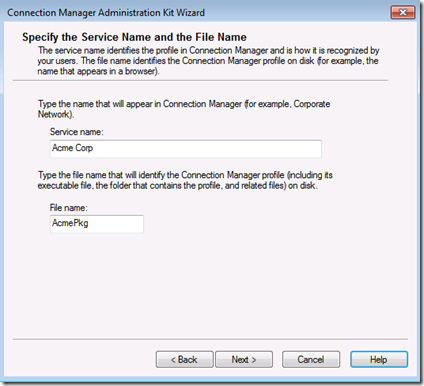
Enter a ‘Friendly’ name for the connection and a file name (<9 characters) for the deployment package.

image

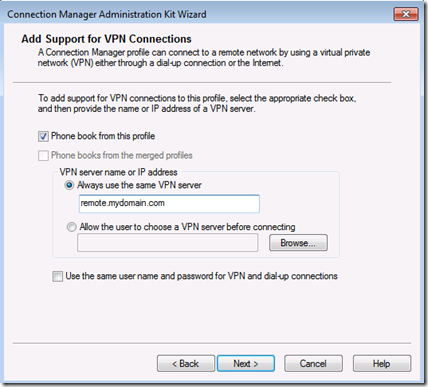
Rather than cluttering this post with unnecessary images, accept the defaults on the next two pages, “do not add a realm name to the user name” and leave the merge profiles boxes empty. In the next window, as per the image below, check Phone book from this profile, always use the same VPN server, and insert the public FQDN or IP of the VPN server.

image

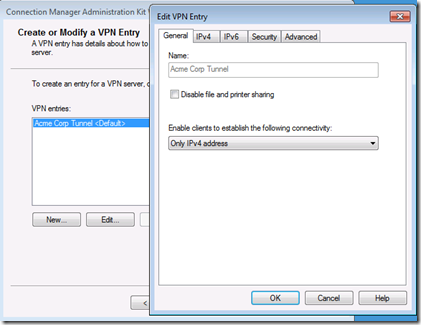
Next highlight your new connection and choose edit.  Under General select Only IPv4 addresses.  If you like, for added security you can disable file and printer sharing, which blocks access to shares on the connecting client’s computer while connected to the VPN.

image

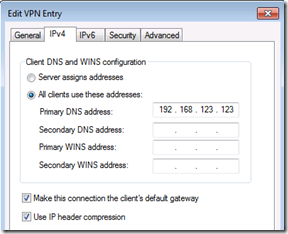
Under IPv4 add the internal IP for your corporate DNS server.  If you have multiple corporate DNS servers you can add a second, and if you have WINS servers you can add those as well.  Do not add public DNS servers here.  I recommend checking “Make this connection the client’s default gateway” (disabling split-tunneling) which blocks access to to the client’s local LAN while connected to the VPN.  By doing so Internet access is actually made via the VPN, rather than through the local router.  One reason you may need to un-check this is it also blocks access to a local networked printer, i.e. one that is not physically attached to the connecting computer.  Leave “Use IP Header compression” checked.  Note that in a user created VPN client using the tools built into a Windows PC, the “default gateway” option can be changed.  When created with CMAK it cannot be changed.  This is intentional for security reasons.  Split-tunneling, allowing the client simultaneous local and remote network access, is considered a security risk.

image

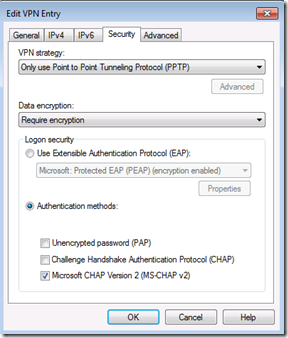
Under security you can leave the defaults or change to “Only use Point to Point Tunneling Protocol (PPTP)”.  If you are connecting to an old server it may also be necessary to also check CHAP authentication, but this is less secure than MS-CHAP v2, so only do so if absolutely necessary.  All 2008 and newer servers use MS-CHAP v2 by default.

image

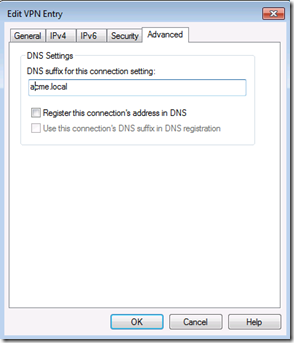
Under advanced add the internal corporate domain suffix.  Check “Register this connection’s DNS address in DNS” if for some reason LAN clients need to resolve the name of the remote computer.  I recommend not doing so if not needed as it adds unnecessary entries to DNS that may not be cleaned up if DNS scavenging is not properly configured.  Select OK, Next, and move on to the next window.

image

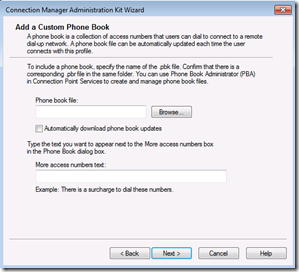
We are not using “phone books” so uncheck “Automatically download phone book updates”

image

From here accept all defaults in the next 4 windows; Configure Dial-up Networking, Specify Routing Tables, Configure Proxy Settings, and Add Custom Actions.

Note: it is assumed the server VPN configuration is basic, assigning IP’s in the same subnet for VPN clients as LAN clients, which is typical of SBS.  However, if the VPN clients are assigned addresses outside of the LAN subnet, and you want to access resources on the corporate LAN other than the VPN server, you will need to add a routing table file, on the “Specify Routing Tables” page, to have the route pushed out to VPN clients.

Though not necessary at all you may want to add a custom graphic or logo to the connection client. This is done on the “Display Custom Logon Bitmap” page followed by the ability to add a custom graphic in the phone book (list of connections), and on the 3rd related page you can choose to use  custom Icon for the deployed VPN connection.

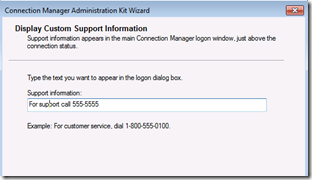
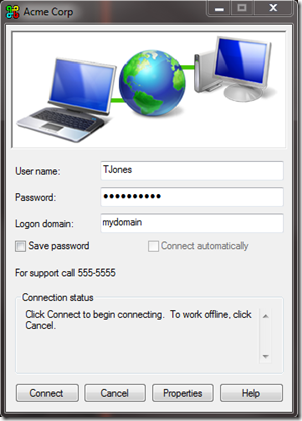
Leave the “Include Custom Help File” as default, and under “Display Custom Support Information”.  You may want to add contact information. This is displayed on the VPN connection client where they enter their user name and password, when trying to establish a connection.

image

Accept the defaults in the remaining windows; “Display a Custom License agreement” and “Install Additional Files…”.  In the final Window “Build the Connection Manager Profile and its Installation Program” leave Advanced uncheck, and assuming you do not wish to make any changes, click Next, and Finished.  The deployable package will be saved in a folder named profiles in the CMAK folder, the default location being: C:\Program Files\CMAK\Profiles\Windows 7 and Windows Vista\   You only need to copy the .exe file to the client computer, in this case AcmePkg.exe

image

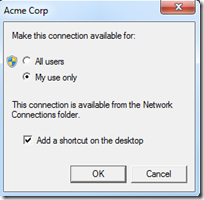
To configure the client, simply double click on the .exe file.  You will be prompted if you want the client to be available to all users or just the current user.

image

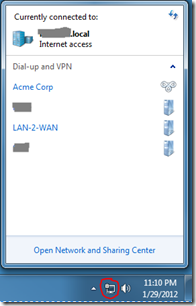
Click OK, and wizard will complete, add a connection icon to the desktop, add the connection to task bar network icon………

image

…….and launch the VPN client.

If you wish to connect enter the user name of a member of your VPN User group, their password, and internal domain name.  The domain name does not have to be present just to connect to the VPN, but in most cases if the PC is not domain joined, it needs to be there to access files using server names, rather than IP’s.

image

You should now have access to resources on the remote server, assuming the VPN at the server end is properly configured, and you have the appropriate Share and NTFS/Security permissions on the server to do so.

If needed, I have bloged in the past about configuring the VPN server.

Configuring a Windows SBS 2003 as a RRAS/VPN Server

SBS 2011 Essentials – Configuring VPN access

Configuring a Windows 2003 RRAS/VPN Server with 1 network adapter

Configure Cisco ASA for SBS 2008/2011 Network using CLI

I recently posted an article entitled “Configure Cisco ASA for SBS 2008/2011 Network using ASDM” which uses the GUI, a very lengthy process, but perhaps easier to understand for those not familiar with the Cisco Command Line Interface (CLI) like me.  However, I did promise to also post the handful of necessary commands to achieve the same thing using the command line. Please find the matching commands below using the same options and sample IP’s as in the previous post. You may wish to review the previous article should you require an explanation of why the various command are necessary. Note: this was done using ASA Version 8.2(5).

Basic router configuration; router name, domain, outside/WAN static IP and subnet mask, and management access:

hostname Cisco-ASA5505
domain-name MyDomain.local
Interface vlan2
ip address  123.123.123.123 255.255.255.248
no http 192.168.123.0 255.255.255.0 inside
http 192.168.123.0 255.255.255.0 inside
no telnet 192.168.123.0 255.255.255.0 inside
telnet 192.168.123.0 255.255.255.0 inside
enable password MyPassword

Disable DHCP on the Inside/LAN interface and set inside/LAN IP:

no dhcpd enable inside
Interface vlan1
no ip address
ip address  192.168.123.254 255.255.255.0
same-security-traffic permit inter-interface

Set default gateway on Outside/WAN interface:

route outside 0.0.0.0 0.0.0.0 123.123.123.121 1

Configure port forwarding for port 25 (SMTP/Exchange), port 443 (Https/RWW/RWA/OWA/Sharepoint), and port 987 (Sharepoint):

name 192.168.123.10 SBS-Server
asdm location 192.168.123.10 255.255.255.255 inside

static (inside,outside)  tcp interface 25 192.168.123.10 25 netmask 255.255.255.255 tcp 0 0 udp 0
static (inside,outside)  tcp interface 443 192.168.123.10 443 netmask 255.255.255.255 tcp 0 0 udp 0
static (inside,outside)  tcp interface 987 192.168.123.10 987 netmask 255.255.255.255 tcp 0 0 udp 0

access-list outside_access_in remark Allow SMTP traffic
access-list outside_access_in extended permit tcp any interface outside eq smtp
access-list outside_access_in remark Allow SSL-OWA-RWA Traffic
access-list outside_access_in extended permit tcp any interface outside eq https
access-list outside_access_in remark Allow SharePoint traffic
access-list outside_access_in extended permit tcp any interface outside eq 987
access-group outside_access_in in interface outside

Allow pings from LAN to Internet:

policy-map global_policy
class inspection_default
inspect icmp

Allow Tracert (requires ping policy changes above):

access-list outside_access_in line 3 remark Allow Tracert
access-list outside_access_in line 4 extended permit icmp any any

Save:

write mem